Thursday, August 12, 2021

fran's fbmp find: drexel pine dresser (and a little bedroom sneak peak)


I am so excited to talk about our new home! This spring, we sold our first home. We had loved making that home our own. It was the perfect house for us, but we were slowly outgrowing it...plus we were moving two states away, so we got lucky in a sellers market, and sold it in days. Finding a house, on the other hand, was tough. We lost several houses, but then got the luckiest when a younger couple was selling their beautiful home, and chose us to buy their house, even though we had competition with an all cash, no cap offer. I believe it's because they had young children and the house was made to raise kids in. We are just so thrilled to have gotten a house in this market. 

This house is twice the size of our last one. It has one more bedroom, it's own dining room, an office, and a formal living room...all things we did not have in our first home. We brought all of our furniture with us, but the majority of it doesn't really fit into the space - it's either the wrong shape or too small for the space. But furniture is expensive, so we are buying it in stages. We started with our bedroom!

I had saved up for the last month so we could furnish part of our bedroom when we moved in. We wanted our room to be calm and bright, and my husband requested to have shades of green in it. We painted one of the walls a really pretty green (Behr Eucalyptus Wreath), and the rest a bright white. When it came to furnishing it, I've always wanted a king sized bed. After months of debating which one to get, we went with the West Elm MidCentury Frame - it's so so pretty in real life and looks great with the green wall and hardwood floors! We went with a Saatva mattress, which is described as "hotel like", and as a belly sleeper, I've really really liked it. I had had my eye on this Crate and Barrel duvet, and I love the texture that it adds to the bed without it being an overwhelming pattern. 

As a side story, prior to medical school, I was really into thrifting. That's how I spent my evenings and weekends when I was working full time - finding goodies at Goodwill and garage sales. Now that I have my life back, and 3 months off before starting my first attending job, as well as a house to furnish, I've really rediscovered that thrifting bug. But with having two small children and a husband who works out of the house, spending hours at the thrift stores isn't really a possibility right now, so I've become a hardcore Facebook Marketplace fiend! In the 6 weeks we have lived here, I've already found several amazing pieces for our house. A few needed a little love, some needed nothing, and I can't wait to see how they tell their story in our house. The overall "look" for our house is transitional - filling our bright and airy spaces with a mix of old school charm with modern touches. That's the great thing about finding furniture and decor that's pre-loved - it doesn't need to fall into one design style, it just needs to fit the space. 

So, we had the bed, the bedding, and the rug, but needed a few other items for our bedroom. Top of the list were a dresser, and bedside tables, and then also a big mirror, lamps, and art. I spent several weeks looking at different dressers on FBMP when I ran across a beautiful 9 drawer pine dresser that was selling for $120. I reached out to the seller immediately, and went to see it that afternoon. It turns out it had been a part of an estate sale but no one bought it, so the price was decreased and put on FBMP...where it promptly became mine! 

As far as I can tell, the dresser is from sometime between the mid 20th century. It's made of pine, with dovetail construction on the drawers. The hardware is brass, but we will get to that in a second! When we got the dresser to our house, I noticed the smell immediately. It smelled like someone's very nice grandmother. The dressers had a paper lining, which was easily removed. I then wiped out each drawer with a 50/50 vinegar/water mixture, which apparently neutralizes perfumes. I then put some baking powder on paper plates, and put them in each drawer, and then put the drawers back in the dresser. We didn't put any clothes in the dresser for a week, and by the end of the week, all the former scents were gone! 

Now that it smelled new, it was time to update the hardware. Because of the very unique drawer pulls, it wasn't really an option to replace them because the stain behind the pulls was different than the rest of the drawer. So I removed all the pulls, soaked them for a few minutes in Dove power wash, and then used this magic powder to remove all the tarnish. It was amazing how a few minutes of scrubbing could complete remove the tarnish! 

Now she's sitting in our bedroom, and is mostly used as a baby changing table. I'm debating what to do above the dresser though. Across from it, above our bed, we already have a large piece of art (see below). Our big mirror is going on the third wall of the room, and the fourth wall currently just has two windows (...that still need curtains). I initially thought another mirror, but we don't really need it since we have the big one on the wall. Then I was thinking maybe a gallery wall? Several pieces of art? I don't know, I feel torn. 

I also bought two bedside tables on FBMP that need to be sanded and painted - they aren't a real wood so painting makes the most sense. I'm thinking maybe black paint and then gold hardware? We also need lamps for the bedside tables, I'd like two additional pillows in a green to go with the wall color, and this blanket for the edge of the bed. Once Theo's pack n play is moved out, we also would like to add a chair and small table in the corner. 

So while I'm excited about where we currently are, there's so much left to do!
paint: Behr Eucalyptus Wreath


*meow*

Tuesday, February 13, 2018

house update: the kitchen and dining room


I'm so excited to finally share our updated kitchen! It's been a long seven months of slowly piecing it together (and we aren't really done yet). The kitchen was a real sticking point when we were debating buying our house as it was just not a functional kitchen. At a quick glance it was great - new appliances, a granite countertop, and white cabinets. But then you look closely and actually think about a full functional kitchen and you realize a few things....like that the current set up only has ONE drawer, three cabinets, and minimal countertop space. We don't own a ton of kitchen things, but enough that we need more than that! But with some convincing CR of the vision, and now nine months later, I think we are both so happy with our decision to buy this home and make it our own!

So above is what our kitchen looked like on the day of closing. When you walk in through the side door of the house, the top left picture is what you saw. If you turned right, you saw what is on the top right picture. To the right and behind of the kitchen entrance is that empty space in the bottom left picture. And then straight ahead to the left was the empty wall you see in the bottom right picture. 

So our plan was to add cabinets against the wall. We initially debated doing a center island instead, but we wanted to have a pantry area, so cabinets against the wall made more sense. A coffee station was to be added to the little space between the kitchen entrance and the bathroom door.

During the first weeks of owning our house, we spent painted the whole house Gliddean's Universal Grey. We replaced all of the hardware with matte black ones. Some people have that knack for mixing metals and colors and so on, but...I'm not one of them. So having a matte black everywhere just made so many things easier!

So here are the before and afters!

Monday, May 15, 2017

we bought a house!


When we were going on our interviews, we always asked residents about their housing situation. CR and I had discussed our future house situation a ton, and had come to the conclusion that ideally we would like to purchase a house when we started our residencies. A big reason for that was because finding a house to rent with two dogs and a cat is pretty difficult, but also because we felt we were ready to take on the responsibilities of finally being home owners. We asked residents about their housing situations since it gave us an idea of the area we could potentially be moving to. We didn't apply to any programs in major cities, so we were often in more suburban areas where I'd say about half of the residents owned homes. Knowing that, I was so excited about the home buying process, and was eager to get started once we found out where we were going to officially live for at least the next four years.

Once we officially matched, we knew we would be buying a house - since it was our number one choice, we had done the unadvisable, and had already researched real estate in that area. Obviously when you think about buying a house, there's a ton of weighing the pros versus the cons. The biggest factor was the money. I have always felt like I'm "throwing away" money by paying someone else's mortgage for them (our current rent is double the mortgage payment on the house we live in). I really was drawn to putting that money towards something that is our own, rather than just paying for someone else's house. Being that we were going to live in that area for at least four years, but probably six years, we used a rent versus buy calculator to see how the finances really work out. Since the area we are moving to has a pretty low cost of living, and houses are very quite affordable (at least when you compare it to cities even just an hour away), the calculator really pointed to how much more financial sense it would be to buy.

Saturday, the day after Match Day, we started our official Zillow searches. Since we were moving to an area where we didn't know anyone, and also because we were brand spanking new to buying a house, I really had no idea about finding a realtor and looking at houses. Basically, I just found a few cute houses on Zillow and contacted the agent listed. Within ten minutes, three of them had called me back. You really have to hustle as a realtor! One buyer's agent spent some time on the phone with us, set up a MLS search for us (I hadn't even heard of such a website before that), and scheduled a morning that following week to look at whatever houses we wanted.

We met up with our buyer's agent the Tuesday after Match Day to look at houses. She was a brand new agent - she had yet to sell her first home. But you know, she was so energetic and really hustling to get us places to look at, emailing us at like 11 PM with new listings, that I knew she would do everything to do right by us. It sounds silly, but I have always appreciated when patients trusted me to learn from their care, so I felt like we owed it to someone else to be their first too. Anyway, we met up on a Tuesday morning at this old, recently somewhat flipped, home in the country. We knew immediately that this was not the house for us, but we did the walk through anyway. Driving away from that first house, I was uncertain about how this process was going to go down. As we drove away, I told CR about how nervous I was that we weren't going to find what we were looking for, especially because we didn't have months and months to get this figured out.

And what exactly what were were looking for? I wasn't even sure. I had like three non-negotiables - it needed a fenceable back yard, I did not want to drive more than 25 minutes to work, and it needed to have central air. In the seven years I have had my dogs, they have never had a completely fenced in yard. All I want is to open a door, and let them play outside for hours without being on a lead. I also didn't want to drive a half an hour every morning at 4 AM, and after having spent most of my adult life without AC, it was time to be comfortable in the summer. Everything else I could work with, but wish list items included a newer bright kitchen, at least three bedrooms, bigger closets, wood floors, and something with character.

Well, after the first house didn't fit basically any of the things we were looking for, I wasn't too hopeful. We drove up to the next house though, and it was like...wow! This is basically exactly what I was looking for. Less than a ten minute drive to my hospital, it was a cute two story brick house with wood floors throughout, a new kitchen, a fireplace, and a huge back yard (without a fence). As I walked through the house, I was like YES YES YES, you are going to be mine. CR was not as convinced as I was - I saw the charm and potential, and he saw the big yard that needed to be fenced in, the busier street it sat on, and the kitchen that actually needed more work than I first noticed. Big bonus though was that it was at the lower end of our desired price range.

We had already agreed that we were not going to put an offer on a house that day - we had started the process of figuring out which bank we wanted to get our mortgage with, so we were still waiting on our work contracts and so on to be able to get anything concretely signed with a bank. We looked at six more homes that day - some were gorgeous, but at the very top of our price range and 35 minutes away from my work, while others were ones we knew we weren't going to buy from the moment we drove up to it (like lego colored rooms or falling down garages).

We went on another full day of house hunting the following week. We had asked that we stop by the cute brick house we saw previously at the end of the day to see if we still felt the same way. We saw a bunch of houses again - some that we could have maybe been okay with buying, but nothing where I was actually excited about the house. Our final stop of the day was at the brick house, where we spent a lot more time actually looking closely at the details. The charm was definitely there - they had recently re-done a lot to the house to get it ready to sell. The floors were all recently refinished - wood floors! No carpets! All windows had recently been replaced. The trim was all white. There was a fireplace!! With a mantle! The kitchen was brand new - new cupboards, appliances, and floors. But there were issues too. While the kitchen was new, the storage was seriously lacking - all the things were on one side of the kitchen, and the other wall was completely bare. We would have to put in a whole row of cupboards - not a huge deal, but also not "move in ready", and still a task for two people who have never done that. The backyard was big, but there were fallen trees and garbage, and it wasn't fenced in. Again, something that can be fixed, but something that would take time and money to fix. The closets weren't the big closets I had imagined having - the house was built in the 1950s, not exactly a time of huge walk in closets. The full bath was smaller, has absolutely zero storage, and is floor to ceiling tile.

But you know what - I loved that about that house. It needed a bit of work, but nothing that we couldn't either figure out ourselves, or hire someone to fix. It had charm - it felt like a real home to me, rather than just a house we would temporarily live in. It had things I had always wanted - wood floors, a semi-open floor plan, natural light, and a place for my dogs to stretch their legs. I could see our lives in there now, and in five years with a baby or two.

The next day, we put in our offer. I was so so so nervous, checking my phone every two minutes. Within twelve hours, they accepted! We had figured out everything with the banks, so we started down the path of getting all of that paperwork done and signed and faxed and emailed. I spent a whole day just trying to email forms and IDs and contracts to get everything done as quickly as possible. Long story short though, when our bank went to go appraise the house, they said it was worth $5000 less than we offered. We went back and forth on what to do - in the end, we asked to go down to the appraisal value with less back at closing. I think the owners were just ready to sell their house, because they accepted our offer. The following week, we had our inspection where everything went really well except that the radon levels were higher than our offer agreement allowed, so the home owners had to pay another $1000 to have a mitigation system installed. We were just happy we were getting the house for even less, and that they had to put that system in! It wasn't until that was all done though that I could finally really believe the house was going to be ours - I was afraid the seller was going to get annoyed with us and just pull out of the deal, even though we weren't trying to play them at all (after all, we did  offer their asking price and they knew that the mitigation system might be a possibility, which is why it was in the initial offer).

Anyway! There was a lot more paperwork, time on the phone, and internet education that happened during that time. I really have to credit CR with all the work he put into this process - he spent so much educating himself on the process of home buying, and doing the majority of the banking paperwork. If it wasn't for him, this process would never have gone as smoothly as it did. He kept me grounded and reminded me of what were looking for him our future home. I can easily be swayed by pretty floors and a nice kitchen, but he reminded me that we needed something practical and that fit our needs. I think we found a perfect mix in this house - a house with character but with a few things that need to be fixed, one that we can grow into a bit, and a place where we can spend the first few years of our marriage. I am so happy that she's finally all ours! Below is a little tour of the place - be on the look out hopefully later this week where I share details of the things we are changing and potential ideas for furnishing this place!


Wednesday, April 12, 2017

figuring out my "interior design" style...help?


The closer we get to figuring out our housing situation for the next few years, the more I get the itch to decorate. And then I get lost in Pinterest and HGTV and try to imagine how I would decorate and change houses, and then realize I have no idea what my "interior design" style is. Do I like farmhouse chic (a la JoJo, CR's HGTV crush) or am I more mid century modern? Can I have a farmhouse table in the same room as a wood floors - how do the woods work together? Do you put a rug underneath it? What kind of sectional is best...or no sectional, and two complimenting couches instead? TV above the fire place or on a separate wall? How many patterns are too many? Can you have gold home decor when you have silver hardware?

I really have no idea how to answer any of these questions (but if you do, please enlighten me because I'm not really joking about those questions). But I do know that we all took years to figure out our own personal clothing style, and I bet you most of us are still working on figuring it out! Which is why, for now, I'm just kind of going with what I like, without having to put a title on it. So my future home may have a farm house table, gallery walls, and gold accents every where - just because I can file it under one category doesn't mean I won't love it!

For those of you who have decorated a house, pretty much from scratch, how did you figure it all out? Did you stick with one style, or did you kind of go with your gut about what you liked and didn't like? 

ps. I found that amazing peace sign hand statue while perusing Shopbop's home section, and wanted to mention that they are having their spring sale right now. 20% off everything if you spend under $500, and 25% if you spend over $500!

please note that Shopbop is a sponsor of this blog

Monday, February 6, 2017

making a rented house a home

(jeans are 7fam!...and apparently we really like fleece)
First of all, how cute are my boys?!

This is us in front of our current house that we are renting. We got super lucky when we found this house to rent at the beginning of third year of school, and have been quite happy with it - it's small (around 900 square feet) but currently the perfect size for us, has a small back yard, has a washer & dryer, and a garage. We couldn't have found a better house for us!

I've been renting homes for the past ten years, since my sophomore year of college. Over the past decade, I've learned a lot about how to make a rented space your own. It's difficult sometimes to make a house that's not yours into something that feels like home - sometimes you can't paint or hang things on the walls, or have the type of flooring you want. There are things you can't change - for example, our house has very little natural lighting, and no ceiling lighting either! I wish we had hardwood floors, but we have carpet and linoleum. Those are structural things I can't do anything about, but how everything else looks in my house - that I have control over!

Here are some of the things I've noticed make the biggest differences in the places I've rented, from choosing similar furniture to fresh flowers to personalized art.

make it cozy with blankets and throw pillows
This probably sounds silly, but I never realized how much of a difference a soft throw and some pillows make it your living room. We have this amazing fuzzy throw I found at Target a few years ago (this current version seems very similar), and it's one of my favorite household items! It just makes the space so much more inviting, plus if you live in drafty house like we do...you'll be happy you have it! Another cute option is this faux shearling throw with tassels. Target is obviously a goldmine when it comes to cozy throws and fun throw pillows - check out these cute faux fur pillows! Definitely going to sneak those into our cart the next time we are at Target! Anyway - if you have a living room you want to make a bit cozier, a simple throw and pillows make a big difference. Our pillows are all white/grey/black, which makes it easy to mix and match with other pillows in the house. 

buying cheap furniture or painting old furniture? go cohesive

When I moved to Pennsylvania from Wisconsin for medical school, I moved in just my car. All I brought with me were my dogs, my clothes, and a few personal things. When I got there, I rented a U-Haul truck and drove to Ikea to buy furniture - I didn't own real furniture before (I always had roommates who owned a few key pieces of furniture, plus my childhood bed), so this was my chance to start fresh. I bought a desk, bookshelf, bed, bedside table, and a dresser...all in white. Now that I live in a house with CR, the furniture is a bit more spread out, but because it all "goes" together, it makes our space look a bit more grown up. CR has an old dresser from his childhood that is painted white and navy, which was perfect for our bedroom. I would of course love to have really nice furniture that isn't all one color, but has more dimension and special features, but for now, our white furniture gives our house some cohesion and a grown up feel that mismatched furniture wouldn't have.

add unique home decor

Like I said, Target is a great place to find really cute picture frames, stand alone decorations, and candles. I have a few nice vases from Jonathan Adler and coasters from Kate Spade via Shopbop that are small touches that make a big difference in smaller darker rented spaces. We also love having a few trays throughout the house to corral remotes and jewelry and so on!

a gallery wall shows off your life and creativity 
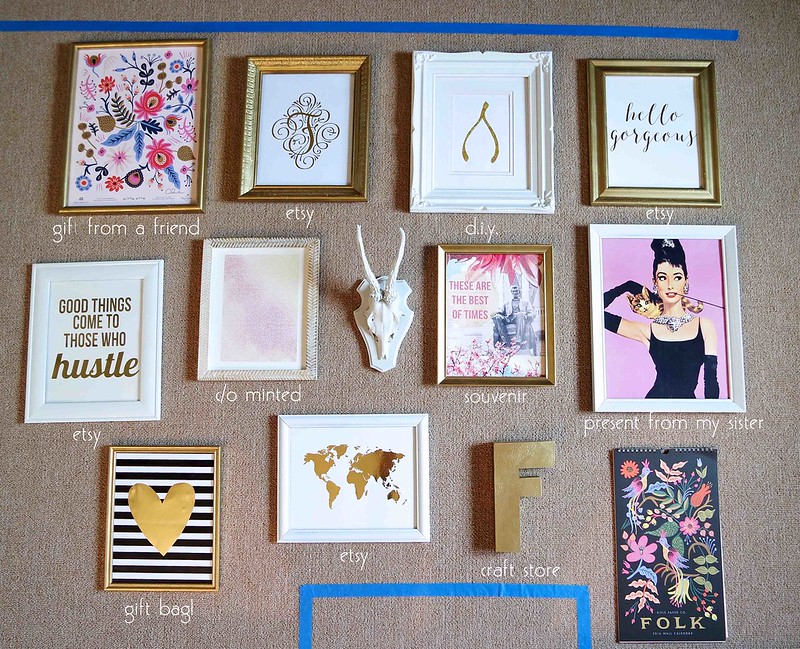
I wrote a post last year about how to create a gallery wall, and it's still one of my favorite things in our house! This is great especially if you aren't allowed to paint the walls - you can even use those command strips if you aren't allowed to put nails into the walls. I love that it combines all different parts of my life and gifts from loved ones - the antlers are from a deer shot by my grandpa (who died when I was a freshman in college), the Rifle Paper company poster in the top left was signed by the artist and gifted to me by a dear friend, a few Etsy prints used as motivation, a print from Minted, a poster from my university, and a calendar that changes every month. We also have a smaller collection of pictures and prints above our bed.

flowers (fresh or fake) brighten up the room
Fresh flowers are one of my biweekly splurges - I just love how they bring a bit of cheeriness into our kitchen! For those of you near a Trader Joe's - they have the best and cheapest flowers! We unfortunately don't have one where I live, so I always make sure to stop at a TJ when I'm in a larger city. I also have several sets of fake flowers - one on our bookshelf and one at my desk. They are from Michaels, and unless you look really closely, you can't tell they are fake! 

celebrate where you're from
cheese board | butter dish | recipe box | beer cap map
Coming from a place with a lot of state pride, I love having just a few Wisconsin related things around the house! Our cheese board was a house warming present from my parents (it doesn't get any more Wisconsin than cheese!). I love it next to the cow butter dish - it's just a little bit of home here in Ohio. My parents got CR this beer cap map for Christmas a few years ago. He obviously needs to drink a few more local NY beers, but I think it's such a fun way to combine where you're from with where you currently live! Uncommon Goods has a ton of state related items if you are looking for inspiration (my favorites include the magnetic key holder and embroidered pillows). Minted also has gold foiled prints of all the states, which I think would be really cute hung up with each of your states next to each other.

and celebrate where you've been together
When I ran across these gold foiled prints from Minted a few months ago, I knew I had to get them. I love the idea of getting ones for every place you live together and lining them up! You can adjust the map to where ever you want (and how zoomed in or out it is), and it prints out to this cute map with the address on the bottom right. I'm already excited to get our one for our home next year too! If you live in bigger cities, they also have pre-made ones. We also started to keep track of all the states we have visited together. I found this globe at Target, and we just drew on the US, and have filled in states as we go! We have a few more states to go ;)

diy things you can move to other houses
The summer between first and second year of school, I really wanted to make a pinboard for our kitchen. I found a tutorial, and made it in an afternoon. It was the perfect item for our kitchen at the time - we used it to hang up pictures of us, bills, and little notes. It was also perfect for when CR and I moved in together because it's a bigger item that can go on the wall, but because it's in a neutral color, it goes with everything! It now hangs next to my desk and holds all sorts of things - sentimental family pictures, post cards from places we've visited, cards from friends, our Christmas card, and my band letter. I love that I made it, so it's a bit more personal, but that it will fit into any house we rent or buy.

plants bring a bit of life to the room

Same as flowers, I love a few plants throughout the house to liven up the rooms a bit. We don't have a ton because our cat likes to punch her teeth through them, but a few have made it out alive! I use one of those slow watering pots too so I can be forgetful about watering them.

find personalized art for your walls
Since you may not be able to paint your walls, you may as well cover them with things you can control! We have several pieces of art hanging around our house that are special to us. I worked with Minted last year, and got two prints of our star signs that hang in the bathroom - I love that it's not super overbearing in your face, but is a personal to us. CR and I go to a lot of Dave Matthews concerts (it's one of our favorite things to do together), and so I found him a "vintage" (ie from 2010) poster on eBay and had it framed for our hallway.

embrace being a renter

Maybe this is temporary, or you plan on being a renter forever, but there are definite perks about not owning a house (my favorite: if something goes wrong, someone else has to fix it!). We love our little home, and will look back fondly at our time in our rented house. I'm glad we got to have it be our first home together, and that we've found a way to make it feel like our home.


Friday, November 6, 2015

creating a gallery wall on a budget


One of my most favorite things in our house is the gallery wall above my desk. While decorating the rest of the house, I tried really hard to not make it a very girly space (although CR will tell you that my white furniture and gold accents don't really agree with that statement). The one space I knew I was going to have be a bit more girly was my desk area, and that the gallery wall was going to take center stage. My gallery walls have gone through a few versions over the years and I think this is my favorite yet. Here's a step by step guide on how I built my gallery wall without spending a ton of money!

step one: pick your colors


I started my gallery wall years ago - I knew when I moved for school two years ago that it was really going to be the first time that I've had my own room to do whatever I want with, so I wanted it to be cute and girly without being over the top. I love how gold and white look together, so that's how I chose my eventual frame color. For my current gallery wall, I wanted a bit more color, so a pretty pink became my accent color. And, of course, black goes with everything.

I find it helps having a general color palette to stick to because not only does it look cohesive, but it also helps to narrow down what goes in your frames.

step two: find your frames

Frames can be the most expensive part of this whole project...but they don't have to be. Every Goodwill I've ever been in has a huge frames section, and I've never seen a normal sized frame cost more than $2. In just a few visits, you can source all the frames you need. I loved doing this because not only did it make the project super cheap, but you can get some really unique looking frames. I always bought real wood frames that for the most part had glass in it (but that wasn't really a requirement for me).

Once you have all of your frames, it's time to clean and spray paint them. I (okay, CR) painted them all again when we moved so that my newer frames matched my older ones that I painted three years ago. I let them set for at least 24 hours before adding the art.

step three: find the art
  • Search Etsy: Etsy has literally thousands of shops with prints! I wanted gold foiled ones, so that's what I searched for. On my gallery wall I have a map print, hustle print, and hello gorgeous print that I bought from this shop (use code FRAN30 to save 30% on an order if you find anything you love!). My F print is from this shop
  • Get crafty: This is a great way to get the look for less - if you have a water color print you love, why not try to make a version yourself? My wishbone was made by my mom with a piece of white cardboard and glitter glue - super inexpensive, but adorable. The wood 'F' is something I found at Joanns fabric store for like $3, and spray painted when I painted the frames.
  • Make it personal: My favorite part! This sometimes takes some time, but it's the part that'll mean the most. The antlers are from a deer my grandpa shot in 1979 - when he died, all the girls in my family got one set of his antlers, and we all have since spray painted them and have them in our homes. The Audrey poster was a Christmas present from my sister that I've had for years now - it's one of my favorites. The Abe poster is from a paper goods store in Madison and depicts one of my favorite places on the planet (plus they really were the best of times!). The Rifle Paper Company print was a present from my friend Ben, who actually met Anna at a pop-up even (it's signed in the corner!). 
  • Think outside of the box: Not every item in your gallery wall has to be a print or a piece of art. See that framed heart in the bottom left? That's actually a gift bag from Target - it cost $2!  
  • Add a calendar: If your gallery wall is going in an office or a kitchen, this is a great way to add variation to your wall. It changes every month, and I think adds that little something extra. Mine is from Rifle Paper Company and I'm obsessed with it. 
  • Get it pre-framed: Minted reached out to me a few weeks ago and asked if I wanted to add one of their limited printed pieces of art to my collection, which was such perfect timing since I was in the process of re-doing my gallery wall! Using Minted was a wonderful way to add a unique piece of art to my wall, and the process was so easy. Since I knew I wanted a pink colored piece, I was able to narrow down their vast collection down to a smaller selection. Once you choose your art, you can also choose what frame (or no frame!) you want. I went with this pretty staccato sunset print (sunsets are my favorite) and the herringbone frame to add some dimension to the wall. I also elected to have the artist add their signature at the bottom, which I think is a great touch that makes it even more personal.
where to buy gallery wall art

step four: put it all together
  • Lay them out: Measure your intended area for the gallery wall, and then tape out this area on the floor. This is especially important if you are working with a larger gallery wall. I also added the outline of my computer on the bottom, as I wanted the gallery to go around it. Lay out all of your frames in your area, and play around with it. Move items around, have others look at it, and then step away for a little bit - a fresh eye an hour later will prevent any regrets once it is on the wall! I generally like the frames to be a bit staggered, especially since there were so many pieces to work with (an exception to this is the gallery wall above our bed - the frames just worked out perfectly into a rectangle!)
  • Make a paper-gallery: This part is kind of annoying, but vital (and really only takes about ten minutes). Cut out the shape of each frame (I used cheap white construction paper from Michael's), flip each frame upside down, and place the paper over it. Then punch a hole into the paper where the nail will go. 
  • Hang up the paper-gallery: Since you have the ground layout, measure where you laid your frames on the floor, and then measure that point on the actual wall - and just hang up your paper-gallery with painters tape. The great thing about this is that you can see how everything actually looks on the wall. When I got my paper-gallery on the wall, I realized everything was just a little too high up on the wall, so I simply just moved the papers down. It saved me 12 extra holes in the wall.
  • Nail the nails and hang up your frames: The best part! Since each paper has a hole where the nail goes, all you have to do is put the actual nail in the hole and hammer! Then hang up your frames...
how to hang up a gallery wall

step 5: admire your work!


gallery wall on a budget
p.s.
the flowers are fake because i'm lazy and my cat likes to eat flowers 
the monogrammed pencil holder is from design darling
my computer background was created using photoshop (+ this monogram tool)
the heart post-its are from amazon
my lamp is from target & is no longer available (although this one is, and is even cooler)