Sunday, November 5, 2017

how to: peloton bike for less (or how to make your own at home spin studio)

Back in the good ol' days of fourth year, I managed to work out 3-6 days a week. I fell in love with spin classes, and went every opportunity I could. I went to our local study religiously, and any time I was in a bigger city for interviews or fun, I would go to Soul Cycle or Fly Wheel, from studios in San Diego, NYC, Philadelphia, and Miami.  I've done all sorts of exercises over the years, from running to weights to yoga to circuit training, and nothing kept my attention like spinning did. I looked forward to that hour where I could just disappear - in a dark room where no one could see me, with music blasting, and my legs just going. It got me through the early phases of my parents separation - no one can see you cry while you're climbing up a hill listening to Adele. It helped me lose weight without feeling like I was hating my life doing it. Basically: I loved spin class.

And then we moved to a city that didn't have a spin studio. And I started working 80 hours a week, getting up at 3:30 AM and not getting home until 7 PM. And while I started going to Orange Theory, and liking it (and knowing that those weights were good for me), I just never looked forward to them. I remember reading AJ's post about her Pelaton bike, and the more I looked into it, the more I wanted it. But the cost ($1995, or $97 a month for 39 months) is pretty steep, especially on a resident's budget. The appealing thing about the bike is having a bike that is all connected, from the actual bike to the class you're taking to the numbers you're creating. I figured that those parts could be put together separately, while still getting the same experience.  So here's what I did!

the necessities
There are four main components to making your own Peloton:
  • The bike: there are a ton of different spin bikes out there, with all sorts of designs and extras. I ended up choosing this bike - it had most of the things I was looking for, and had great reviews. It has most of the standard features of a regular spin bike - the only thing this one doesn't have is a computer sensor, which is something most bikes at this price range don't have either. It showed up at my house within 3 days, and took CR about 30 minutes to put together. 
  • Sensor: to make up for the bike not having a computer, you can buy a sensor for $40 that attaches to the pedal to keep track of your cadence (how fast you are spinning). It attaches to an app that goes on your phone, so you can match the cadence that the instructors say. The only down side to not having a computer attached to the bike is that you can't measure resistance, which I never had at my regular spin class any way, but for those of you who are used to Fly Wheel and having a set resistance number, that may bother you. I personally don't care, so this was the perfect alternative. 
  • Peloton app: The app itself is of course free, but the subscription costs $12.99 a month for unlimited amount of classes. There are up to 14 live rides a day, and over 4000 saved rides. You can filter by time length of classes, type of classes, and instructors. The instructors are very similar to the ones you see at Soul Cycle or Fly Wheel - high energy, fit, enthusiastic instructors. 
  • Monitor holder: The Peloton app works on both iPhones and iPads, so if you don't have an iPad, you can use your phone. I personally like having a slightly larger screen, so I use my iPad mini. I use this tablet holder, which works great for holding the screen in front of you. It's no 21.5 inch screen like the Peloton bike has, but I personally don't think you need that huge of a screen to have someone tell you how fast to spin your bike ;)

Of course, there are some items that enhance the experience. Here are the things that are bonuses, but aren't necessary:
  • Floor mats: our bike is in the basement, which has a concrete floor. While the bike is pretty sturdy, there is definitely a bit of rocking when you're standing up, so I recommend that if you're bike is going to be on a hard surface, having some kind of padding underneath is a good idea. This pack comes with 6 pieces, which is the perfect size to put under the bike. Another option could be an older yoga mat that you're no longer using. 
  • Bike shoes: I've had this pair from Shimano for the past nine months, and love them. While you can ride the bike with just normal tennis shoes, having spin shoes makes it easier - you have better control over the wheel, and because you don't have to point your toes as much to keep your feet in the baskets, your feet/calves won't hurt. I highly highly recommend getting spin shoes if you are going to spin even semi-regularly. Both the bike and the shoes have the SPD clip, which is the standard clips most spin studios use. 

And then there are things that are absolutely not necessary, but are fun anyways:
  • A fitness watch: I've had my Apple Watch for over a year, and it is such a great motivator for any type of work out. You can read my review of my watch here. Definitely not a necessity, and you burn calories even if you don't have a watch that tells you how many you burned, but it somehow feels like an accomplishment to see the number at the end. 
  • Cute work out clothes: you guys know I'm all about Old Navy's work out clothes - they are inexpensive, and hold up well. Have you guys seen their newest pair of cropped leggings? I love. I also own several pairs of their sports bras - they are definitely more of a compression sports bra than a shaping one, but that's the style I prefer. I have and love the floral version. 

Here's my screenshot from this morning's ride - I'm honestly considering going on another ride tonight just because it was so much fun!

Wednesday, February 3, 2016

how to: tie an oversized scarf

Back when I didn't wear a white coat most days, you were more than likely to find me wearing a scarf between the months of October and April. I just love having something warm around my neck, and I find it's the easiest (and comfiest) way to complete an outfit in the colder months. Now that I wear my white coat, I don't wear scarves during the week as often, but still wear them all weekend long. How I tie my scarves is one of my most frequently asked questions, so today I'm sharing alllll the secrets. 
how to tie an oversized scarf
It's really not difficult at all - it's actually stupidly simple. The real secret is finding the right kind of scarf. While blanket scarves are still the scarf du jour, I really prefer oversized scarves - the fluffy kind that are warm and comfortable, but don't take over your entire body. Mine above is from Ann Taylor, and is the perfect example of what I'm talking about. Similarly, my tan scarf from Nordstrom is also the perfect size. 

To tie your scarf, hold it at one corner of the scarf - this stretches the scarf to its longest length, and makes it so your ends won't be as bulky. Loop it around your neck once, so that the ends are even on both sides. Then take the top half of the tails and tuck it up into the loop. That's it! 

Simple stupid, and works every time :)

Wednesday, December 30, 2015

how to: set a clothing budget and stick to it


A little under four years ago, I realized that I was basically living paycheck to small paycheck. I was also going to the mall almost every weekend. I wasn't spending excessively and I wasn't going into debt, but the day or two before payday always made me nervous. I finally decided it was time to crack down and get my shopping and spending under control.

Since then, and quite a few different financial situations later, I have successfully stuck to basically that same budget for four years. I have been able to pay off other debt, go on a few amazing vacations, and feel like I'm just at a better place financially. Not only have my finances been figured out, but so has my style. Being on a budget means every purchase needs to be thought about just a little more. It's easy to throw down $25 here, $50 here, but those add up so quickly. Having to put more thought into each purchase, looking to see if it is exactly what you want rather than settling for something not as good, and how those pieces fit in your closet, means that gradually over time your style and closet will evolve.

While I initially started a clothing budget to keep myself on track financially, I am so excited to see where it has gone when it comes to blogging. I think that blogging can be wonderful, but also so misleading. There are many bloggers who seem to have endless supplies of new clothes, sometimes very expensive items, but they don't talk about the money behind it. I think it gives readers a sense that if the bloggers can afford to buy all that, then so should they, and it can quickly become this weird mix of keeping up with the Jones.blogspot.com while not actually being able to comfortably afford it. I am excited to see the bloggers who post about their budget every month because it gives other women out there a more grounded outlook on clothes. That's not to say that I as a graduate student am the end all be all to what all graduate students are and should be spending on clothes. But I lead a very average life, and so sharing the details of that when it comes to money and clothes makes it all seem a bit more real rather than the fantasy that blogs sometimes portray.

Friday, November 6, 2015

creating a gallery wall on a budget


One of my most favorite things in our house is the gallery wall above my desk. While decorating the rest of the house, I tried really hard to not make it a very girly space (although CR will tell you that my white furniture and gold accents don't really agree with that statement). The one space I knew I was going to have be a bit more girly was my desk area, and that the gallery wall was going to take center stage. My gallery walls have gone through a few versions over the years and I think this is my favorite yet. Here's a step by step guide on how I built my gallery wall without spending a ton of money!

step one: pick your colors


I started my gallery wall years ago - I knew when I moved for school two years ago that it was really going to be the first time that I've had my own room to do whatever I want with, so I wanted it to be cute and girly without being over the top. I love how gold and white look together, so that's how I chose my eventual frame color. For my current gallery wall, I wanted a bit more color, so a pretty pink became my accent color. And, of course, black goes with everything.

I find it helps having a general color palette to stick to because not only does it look cohesive, but it also helps to narrow down what goes in your frames.

step two: find your frames

Frames can be the most expensive part of this whole project...but they don't have to be. Every Goodwill I've ever been in has a huge frames section, and I've never seen a normal sized frame cost more than $2. In just a few visits, you can source all the frames you need. I loved doing this because not only did it make the project super cheap, but you can get some really unique looking frames. I always bought real wood frames that for the most part had glass in it (but that wasn't really a requirement for me).

Once you have all of your frames, it's time to clean and spray paint them. I (okay, CR) painted them all again when we moved so that my newer frames matched my older ones that I painted three years ago. I let them set for at least 24 hours before adding the art.

step three: find the art
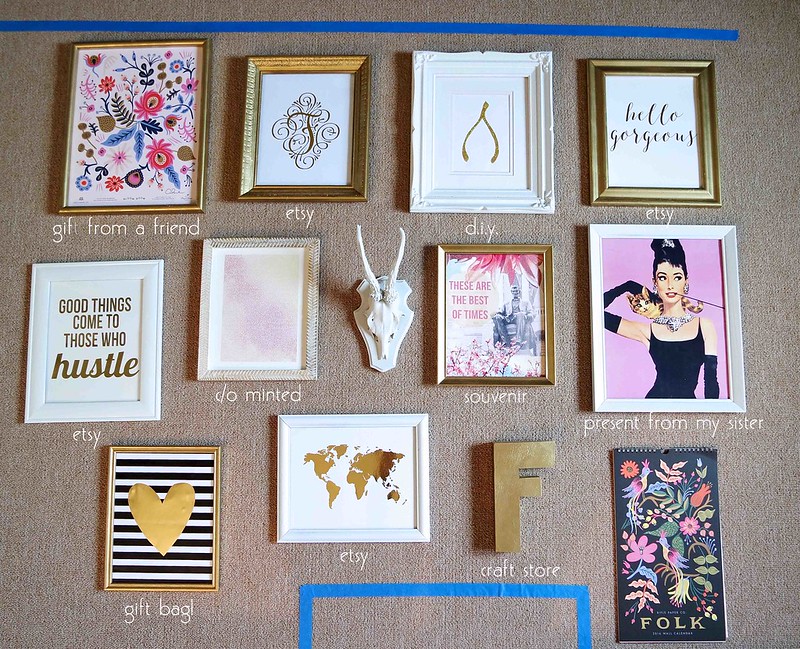
  • Search Etsy: Etsy has literally thousands of shops with prints! I wanted gold foiled ones, so that's what I searched for. On my gallery wall I have a map print, hustle print, and hello gorgeous print that I bought from this shop (use code FRAN30 to save 30% on an order if you find anything you love!). My F print is from this shop. 
  • Get crafty: This is a great way to get the look for less - if you have a water color print you love, why not try to make a version yourself? My wishbone was made by my mom with a piece of white cardboard and glitter glue - super inexpensive, but adorable. The wood 'F' is something I found at Joanns fabric store for like $3, and spray painted when I painted the frames.
  • Make it personal: My favorite part! This sometimes takes some time, but it's the part that'll mean the most. The antlers are from a deer my grandpa shot in 1979 - when he died, all the girls in my family got one set of his antlers, and we all have since spray painted them and have them in our homes. The Audrey poster was a Christmas present from my sister that I've had for years now - it's one of my favorites. The Abe poster is from a paper goods store in Madison and depicts one of my favorite places on the planet (plus they really were the best of times!). The Rifle Paper Company print was a present from my friend Ben, who actually met Anna at a pop-up even (it's signed in the corner!). 
  • Think outside of the box: Not every item in your gallery wall has to be a print or a piece of art. See that framed heart in the bottom left? That's actually a gift bag from Target - it cost $2!  
  • Add a calendar: If your gallery wall is going in an office or a kitchen, this is a great way to add variation to your wall. It changes every month, and I think adds that little something extra. Mine is from Rifle Paper Company and I'm obsessed with it. 
  • Get it pre-framed: Minted reached out to me a few weeks ago and asked if I wanted to add one of their limited printed pieces of art to my collection, which was such perfect timing since I was in the process of re-doing my gallery wall! Using Minted was a wonderful way to add a unique piece of art to my wall, and the process was so easy. Since I knew I wanted a pink colored piece, I was able to narrow down their vast collection down to a smaller selection. Once you choose your art, you can also choose what frame (or no frame!) you want. I went with this pretty staccato sunset print (sunsets are my favorite) and the herringbone frame to add some dimension to the wall. I also elected to have the artist add their signature at the bottom, which I think is a great touch that makes it even more personal.
where to buy gallery wall art

step four: put it all together
  • Lay them out: Measure your intended area for the gallery wall, and then tape out this area on the floor. This is especially important if you are working with a larger gallery wall. I also added the outline of my computer on the bottom, as I wanted the gallery to go around it. Lay out all of your frames in your area, and play around with it. Move items around, have others look at it, and then step away for a little bit - a fresh eye an hour later will prevent any regrets once it is on the wall! I generally like the frames to be a bit staggered, especially since there were so many pieces to work with (an exception to this is the gallery wall above our bed - the frames just worked out perfectly into a rectangle!)
  • Make a paper-gallery: This part is kind of annoying, but vital (and really only takes about ten minutes). Cut out the shape of each frame (I used cheap white construction paper from Michael's), flip each frame upside down, and place the paper over it. Then punch a hole into the paper where the nail will go. 
  • Hang up the paper-gallery: Since you have the ground layout, measure where you laid your frames on the floor, and then measure that point on the actual wall - and just hang up your paper-gallery with painters tape. The great thing about this is that you can see how everything actually looks on the wall. When I got my paper-gallery on the wall, I realized everything was just a little too high up on the wall, so I simply just moved the papers down. It saved me 12 extra holes in the wall.
  • Nail the nails and hang up your frames: The best part! Since each paper has a hole where the nail goes, all you have to do is put the actual nail in the hole and hammer! Then hang up your frames...
how to hang up a gallery wall

step 5: admire your work!


gallery wall on a budget
p.s.
the flowers are fake because i'm lazy and my cat likes to eat flowers 
the monogrammed pencil holder is from design darling
my computer background was created using photoshop (+ this monogram tool)
the heart post-its are from amazon
my lamp is from target & is no longer available (although this one is, and is even cooler)


Tuesday, September 30, 2014

how i edit instagram pictures

Instagram is my social media of choice. I have always loved taking pictures and documenting whatever is going on around me, so now that it's socially acceptable to take pictures all the time, I'm even more all about it.

While everyone uses IG differently, I like to keep it pretty "snap shots of life" kind of a space, so I rarely post blog pictures, or super staged pictures. I do want it to look nice though, so a couple of editing tricks have made a huge difference in picture quality. Some of it I figured out myself, but I've learned little tips and tricks from Grace [her instagram here], Laura [instagram here], and my good friend Ben (who actually was just made an Instagram suggested user, so he definitely knows what he's doing!). 

So besides the typical pieces of advice (take it in natural light, take several pictures so you have options, don't be super obnoxious when it comes to picture taking), here is how I approach instagram picture editing.

I have a ton of different photo editing apps on my phone, but my top ones are VSCOcam, Snapseed, and Retouch. I also use Diptic (for collage making), Over (puts words over your pictures), Afterlight (for sun flares),  and Instasize (for making wider pictures into a square). Here's the general order of how I edit my pictures: 
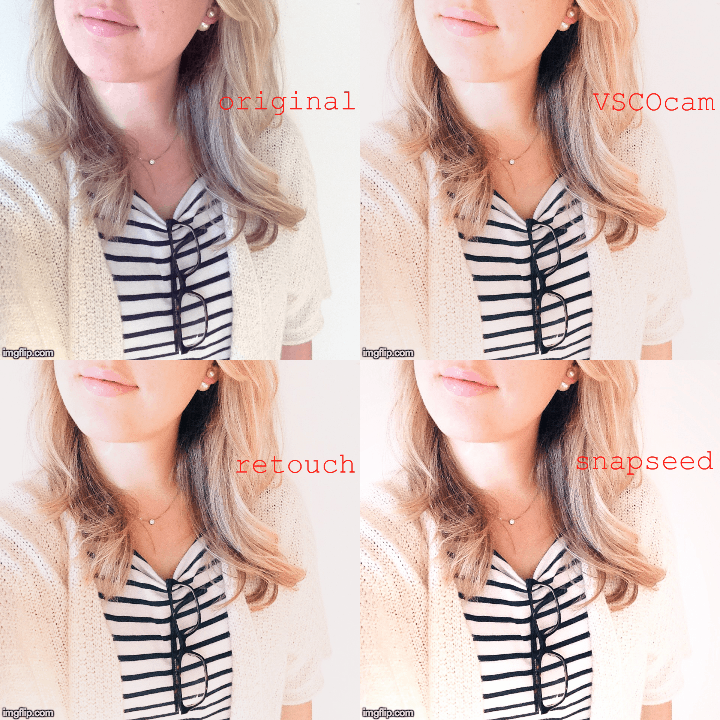
  1. This is the original untouched picture. I'm standing against my living room wall because it has the most natural sunlight without having any direct light on me. I took 5 pictures, and this is the one I felt the least dweeby in.
  2. I always use VSCOcam first. It comes with a good sampling of various filters, and over the last few months I've purchased a couple more. I generally try to keep my pictures softer and more mellow, but that's just the look I'm going for - there are so many different options! After choosing a filter, I usually add +1 to the exposure, contrast, and sharpness.
  3. touchRetouch is basically a mini photoshop for your phone. I don't know how to use photoshop in real life at all, but this makes fixing little things super easy. I used the brush here to cover up a blemish that concealer just won't cover up in real life. I don't like when people make their pictures look completely unnatural, but I also don't want to give you a close up of a zit. It also has a stamp tool that I am still slowly figuring out how to use.
  4. Snapseed is an app I use to brighten certain parts of the picture. You can choose any color in the picture, then have it it change all the parts of the picture that are that color. Here I just chose to make the white a little brighter, and the stripes a little darker. It almost looks a little blown out on a big computer screen, but I think it helps a lot with tiny iPhone screens.
All of that takes me maybe 3-4 minutes, but I think it makes the picture that much better. Plus it's fun! Here's the whole process in GIF form:

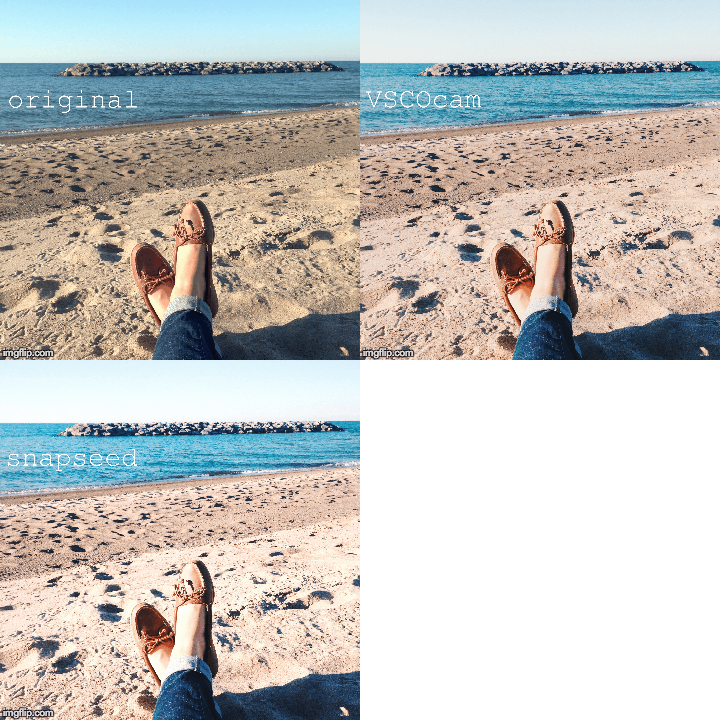
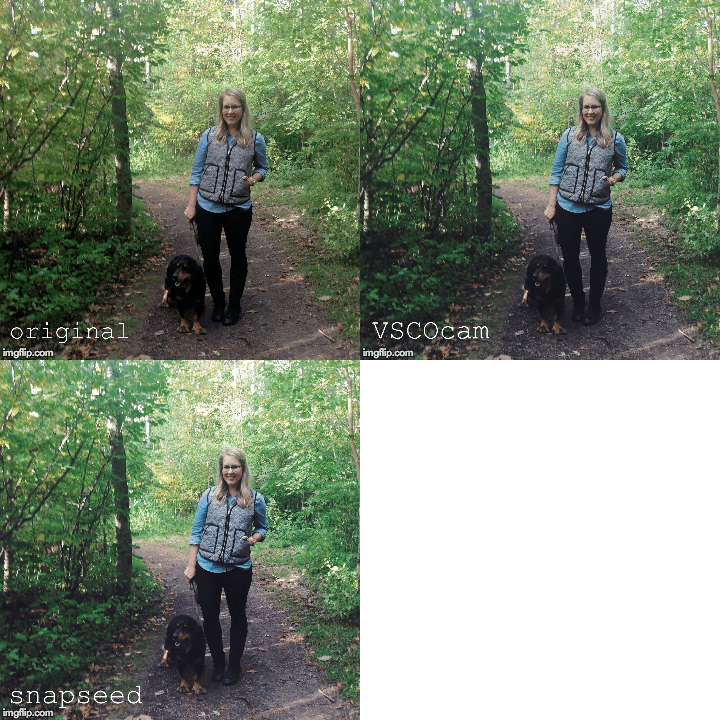
Here are a couple more examples of edited pictures:


I'd love to hear how you edit your pictures, or what tips and tricks you've learned along the way!

For more instagram tips:

Looking for new people to follow? I love these, these, and these guys!

P.S. In the first picture I'm wearing my favorite striped tee + newest eBay purchase