

One of my most favorite things in our house is the gallery wall above my desk. While decorating the rest of the house, I tried really hard to not make it a very girly space (although CR will tell you that my white furniture and gold accents don't really agree with that statement). The one space I knew I was going to have be a bit more girly was my desk area, and that the gallery wall was going to take center stage. My gallery walls have gone through a few versions over the years and I think this is my favorite yet. Here's a step by step guide on how I built my gallery wall without spending a ton of money!
step one: pick your colors

I started my gallery wall years ago - I knew when I moved for school two years ago that it was really going to be the first time that I've had my own room to do whatever I want with, so I wanted it to be cute and girly without being over the top. I love how gold and white look together, so that's how I chose my eventual frame color. For my current gallery wall, I wanted a bit more color, so a pretty pink became my accent color. And, of course, black goes with everything.
I find it helps having a general color palette to stick to because not only does it look cohesive, but it also helps to narrow down what goes in your frames.
step two: find your frames
Frames can be the most expensive part of this whole project...but they don't have to be. Every Goodwill I've ever been in has a huge frames section, and I've never seen a normal sized frame cost more than $2. In just a few visits, you can source all the frames you need. I loved doing this because not only did it make the project super cheap, but you can get some really unique looking frames. I always bought real wood frames that for the most part had glass in it (but that wasn't really a requirement for me).
Once you have all of your frames, it's time to clean and spray paint them. I (okay, CR) painted them all again when we moved so that my newer frames matched my older ones that I painted three years ago. I let them set for at least 24 hours before adding the art.
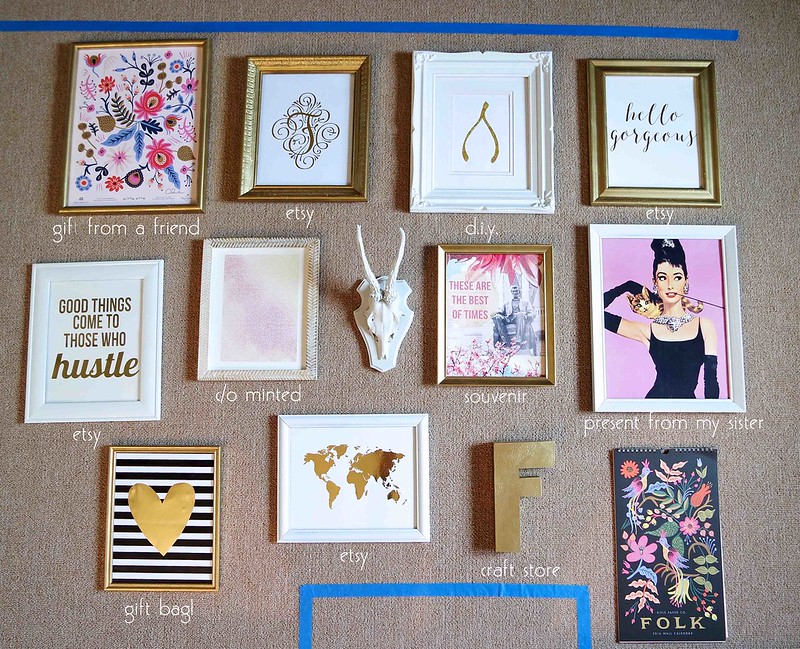
step three: find the art
- Search Etsy: Etsy has literally thousands of shops with prints! I wanted gold foiled ones, so that's what I searched for. On my gallery wall I have a map print, hustle print, and hello gorgeous print that I bought from this shop (use code FRAN30 to save 30% on an order if you find anything you love!). My F print is from this shop.
- Get crafty: This is a great way to get the look for less - if you have a water color print you love, why not try to make a version yourself? My wishbone was made by my mom with a piece of white cardboard and glitter glue - super inexpensive, but adorable. The wood 'F' is something I found at Joanns fabric store for like $3, and spray painted when I painted the frames.
- Make it personal: My favorite part! This sometimes takes some time, but it's the part that'll mean the most. The antlers are from a deer my grandpa shot in 1979 - when he died, all the girls in my family got one set of his antlers, and we all have since spray painted them and have them in our homes. The Audrey poster was a Christmas present from my sister that I've had for years now - it's one of my favorites. The Abe poster is from a paper goods store in Madison and depicts one of my favorite places on the planet (plus they really were the best of times!). The Rifle Paper Company print was a present from my friend Ben, who actually met Anna at a pop-up even (it's signed in the corner!).
- Think outside of the box: Not every item in your gallery wall has to be a print or a piece of art. See that framed heart in the bottom left? That's actually a gift bag from Target - it cost $2!
- Add a calendar: If your gallery wall is going in an office or a kitchen, this is a great way to add variation to your wall. It changes every month, and I think adds that little something extra. Mine is from Rifle Paper Company and I'm obsessed with it.
- Get it pre-framed: Minted reached out to me a few weeks ago and asked if I wanted to add one of their limited printed pieces of art to my collection, which was such perfect timing since I was in the process of re-doing my gallery wall! Using Minted was a wonderful way to add a unique piece of art to my wall, and the process was so easy. Since I knew I wanted a pink colored piece, I was able to narrow down their vast collection down to a smaller selection. Once you choose your art, you can also choose what frame (or no frame!) you want. I went with this pretty staccato sunset print (sunsets are my favorite) and the herringbone frame to add some dimension to the wall. I also elected to have the artist add their signature at the bottom, which I think is a great touch that makes it even more personal.
step four: put it all together
- Lay them out: Measure your intended area for the gallery wall, and then tape out this area on the floor. This is especially important if you are working with a larger gallery wall. I also added the outline of my computer on the bottom, as I wanted the gallery to go around it. Lay out all of your frames in your area, and play around with it. Move items around, have others look at it, and then step away for a little bit - a fresh eye an hour later will prevent any regrets once it is on the wall! I generally like the frames to be a bit staggered, especially since there were so many pieces to work with (an exception to this is the gallery wall above our bed - the frames just worked out perfectly into a rectangle!)
- Make a paper-gallery: This part is kind of annoying, but vital (and really only takes about ten minutes). Cut out the shape of each frame (I used cheap white construction paper from Michael's), flip each frame upside down, and place the paper over it. Then punch a hole into the paper where the nail will go.
- Hang up the paper-gallery: Since you have the ground layout, measure where you laid your frames on the floor, and then measure that point on the actual wall - and just hang up your paper-gallery with painters tape. The great thing about this is that you can see how everything actually looks on the wall. When I got my paper-gallery on the wall, I realized everything was just a little too high up on the wall, so I simply just moved the papers down. It saved me 12 extra holes in the wall.
- Nail the nails and hang up your frames: The best part! Since each paper has a hole where the nail goes, all you have to do is put the actual nail in the hole and hammer! Then hang up your frames...

step 5: admire your work!

p.s.
the flowers are fake because i'm lazy and my cat likes to eat flowers
the monogrammed pencil holder is from design darling
my computer background was created using photoshop (+ this monogram tool)
the heart post-its are from amazon
my lamp is from target & is no longer available (although this one is, and is even cooler)