Thursday, November 12, 2015

hunter boots for thicker calves

hunter boots for thicker calves When I still was receiving a tax refund, I used to use a portion of it to by myself something nice that didn't normally fit into my budget. Three years ago, I decided I wanted a pair of Hunter boots. I had seen so many cute pictures of them on other bloggers, and they actually made sense living in the rainy and snowy climate. I went down to the local boot store to pick out my pair, and was so disappointed when they barely fit on my legs. Instead of looking sleek and cute, they were all bunched up and uncomfortable looking. 

I didn't really love the look of the Huntress, their rainboots made for large calves just because I have calves that are slightly larger than average, but I don't really need wide calf boots either. Luckily for me, the sales associate told me that Hunter makes a style that isn't sold as widely that looks like their normal boots, but has an adjustable back. I was, of course, thrilled. 

Since then, I have worn these boots more than just about any other pair of shoes I own. If you too love the look of Hunters but maybe don't have the thinnest of calves, I highly suggest checking out the adjustable pairs. The only drawback is that they come in just a few colors - I would love to own a shiny red pair, but they just don't make them. How do we go about lobbying for more colors? ;)
J.Crew - Boy shirt in crinkle gingham

DSC00187
Blouse: J.Crew [exact]
Sweater: Aritizia
Vest: J.Crew Factory [exact]
Jeans: Gap [very similar]
Boots: Hunter [exact]
DSC00192
On a different, slightly more angry note, I have to be honest and say I am SO disappointed in the sweater I bought from Aritizia. I followed the washing instructions exactly, and it still shrunk and has starting pilling terribly. I'm like actually pretty upset by this - $100 is a huge amount of money to pay for something that falls apart after wearing it one time. I tried wearing it on the day I took these pictures in hopes that it would stretch out again, and as you can see...it didn't. I've tried all the tricks to make it go back to what it was before, but it hasn't work. Expensive lesson learned. 

Wednesday, November 11, 2015

for work / for play / for a date

Typically, I kind of love celebrity clothing lines. I think, especially if you like that celebrity's style, that it's a great way to get their look at your own budget. I was very excited when I was asked to share a few new pieces from Eva Mendes's line for New York & Company because I have always loved Eva's style. I think she's just such a classic beauty, always knows how to dress her body, and knows how to mix prints, and all of that is reflected in her line. From more sultry silhouettes to refined pieces perfect for the office, I just really liked all of it. Below are three looks showcasing pieces from her line - one for work, one for a casual weekend, and one for a night out, plus a few more picks from her current line!

for work: featuring the gallery skirt

New York & Co. - Eva Mendes Collection - Gallery Skirt
DSC00283
DSC00271
skirt: c/o NY&Co. [exact]
blouse: H&M
shoes: Frye
bracelet: c/o NY&Co. [exact]

for the weekend: featuring the everly cowl neck sweater

DSC00388
DSC00433
New York & Co. - Eva Mendes Collection - Everly Cowl-Neck Tunic Sweater
DSC00389
sweater: c/o NY&Co. [exact]
blouse: Gap
jeans: Madewell
purse: Sole Society
shoes: Frye

for a date: featuring the sabrina dress + st. germain pump

DSC00552
Untitled-1
New York & Co. - Eva Mendes Collection - Sabrina Dress - Floral
DSC00600

dress: c/o NY&Co. [exact]
pumps: c/o NY&Co. [exact]
bracelet: c/o NY&Co. [exact]

Below are a few more of my picks from the collection. My favorite is the pretty blush eyelet skirt!


one | two | three | four

Thank you to New York & Company and ShopStyle for sponsoring this post! 


Tuesday, November 10, 2015

beauty tuesday: sephora VIB sale


Sephora is probably my favorite store in the mall. Even on days when I don't find a single sweater/dress/jeans that fit me the way I want, I'm always able to find something I love at Sephora. As we all know, they very very rarely have sales on their pretty (expensive) products. Starting this Friday (the 13th! eek), the code VIB20 will get you 20% off everything! Below are my recommendations of products I love, and the items I hope to buy. 

If you have any recommendations on items or have experience with any on my wishlist, I'd love to hear them!

recommendations
  1. BareMinerals Complexion Rescue: If you are looking for a product that will give you a light-medium coverage, and if you have drier skin that you'd like to look dewier, then the complexion rescue will be perfect for you. On lighter make-up days, I wear it alone, and it is perfect for evening out redness and providing a light coverage. On heavier make-up days, I mix it with my foundation to add some much needed moisture into the mix (see it in my daily make-up routine here).
  2. TooFaced Better Than Sex: Definitely a holy grail item for me! Two layers over a layer of the L'oreal primer are all I need to get thick and long looking lashes. I've been using it for two years, and will definitely stock up during this sale!
  3. Dior Lipglow: A little bit goes a long way. It works with your own lip chemistry to create a color that is both flattering, and unique! It also makes your lips so soft. This is perfect if you are looking into wearing more colors on your lips, or if you want something for days you don't want to wear lipstick (I wear this in the hospital all the time). 
  4. Boscia Konjac Sponge: I've tried all sorts of products over the years to combat the flakiness my skin gets during the winter, from the Clarisonic to scrubs to home remedies. This is the best I've found - best part is that it only costs $15! 
  5. Smashbox Halo Powder: Another holy grail item for me - I've been using it for five years! It provides the perfect amount of coverage, isn't drying, and lasts foreveerrrrrr. 

wishlist
  1. TooFaced Natural Eye Shadow: I've been using the same Stile eyeshadow palette for over two years now, so I'd like to try something new. I love the pretty neutrals in this palette that can be started natural and work up to a bit more vampy. 
  2. Tata Harper Resurfacing Mask: Grace raves about this mask all the time, and after seeing her skin IRL, I'm convinced I need to try it too. The reviews online are just as in love with it!
  3. Dior Addict Lipstick: Now that it's almost winter, it's time to add an ultra-moisturizing lipstick to the rotation. This Dior lipstick has a moisturizing core - the perfect (colorful!) way to get through the cold months ahead. I'm thinking of trying out the "bold" color.
  4. Fresh Face Oil: I got a sample of this a few months ago, and used it every day for weeks. I really liked the way it quickly absorbed into the skin, and helped my rougher patches be not as rough. I've tried a few other oil samples since then, and none have lived up, so it's time to take the plunge and get the full size!
  5. Becca Luminizing Skin Perfector: another item that Grace has raved about, and after not being able to find it in three separate stores, an online order is the perfect way to get this in my hands. I'm going to get it in the travel size first just to make sure it's something I'll actually use, but if looks anywhere as good on me as it does on Grace, the big bottle will be purchased eventually. 

Look out for reviews on some of the above products ...as soon as they show up at my house ;)

Sunday, November 8, 2015

top three [11.08.2015]

sperrys + rolled jeans foreva and eva

medicine
  • Caffeine has a mild, transient antidepressant action. Patients with depression tend to significantly increase their use of caffeine (and probably also why we all gravitate toward it on a daily basis!)
  • Capgras Syndrome is when a person believes that someone in their life has been replaced by a "double" or a look-alike. We actually saw a patient who had it this week - it was very interesting to witness, but also very sad.
  • Prader-Willi syndrome is caused by the absence of expression of the paternally active gene on chromosome 15. These patients typically have a cognitive impairment, behavioral issues, hypogonadism, and obesity. They also have impaired satiety, which leads to binge eating, which in several cases has led to gastric rupture. These patients complained of slight abdominal discomfort, although the significant gastric necrosis in their abdomen!

on the internet

spotted
  • I think I've found my Christmas sweater!! *hearteyes*
  • Not quite sure how flattering how it would be (my guess is not very), but I kind of love the idea of a sweater skirt - doesn't that sound so comfy? 
  • I am completely obsessed with this large faced watch. It's so beautiful (and a bit different from the other watches in my collection!)

ask me anything
  • How is setting up the apartment going?
    • SO good! We were promised new carpet, but our landlord is a bit slow on delivering on that promise. We have moved in all of furniture, and now are doing little things to make it our own. I do plan on writing a few posts here and there on it - starting of course with my gallery wall!
  • How does one tackle the med school student loan debt? I understand doctors get paid a lot, but I assume with all the debt they have they don't get to enjoy "wealth" right away?
    • So during residency, we won't be making "the big bucks". During those years, our student loan is paid back on an income-basis. The government understands that as residents, we won't be making a ton of money, so it's all based on what we will be making. Once residency is over, personally, my plan is to try to pay back as much as I can in as short of time as possible. Luckily, I go to a fairly inexpensive school and live in an area with a lower cost of living, so I don't take out as much as others I know, BUT it's still a ton, so I want it gone as quickly as possible. It's definitely overwhelming just thinking about it!
  • If I couldn't be blonde, I'd be ________.
    • A redhead! I tried it years ago, but it just took too much effort. I just think it's so pretty!

on franish
  • on the blog: a how-to on creating a gallery wall on a budget
  • on the instagram: are these coming out earlier and earlier every year? 
  • on the twitter: did I miss this vital step in make up applications? :/

notable sales

personal
  • I'm about to start my last week of psych, and I'll be honest, I'm a bit excited. My next rotation is an elective in pathology, which I'm really excited about! I'm hoping this one will be a bit more hands on :)
  • I got my attachments off my teeth this week! I still have to wear my retainer all the time, but it was exciting to take one step closer to being done. I also have an appointment with a cosmetic dentist so I can finally get my front tooth fixed (it's half fake, and now the wrong shape and color, so it has to be fixed). I can't wait to show you guys the final product!
  • This weekend I went up to the Finger Lakes with my best friends and we had so much fun! We went wine tasting, cheese tasting (!!!), playing Heads Up, and just spent a lot of time talking. It was the best. 

Friday, November 6, 2015

creating a gallery wall on a budget


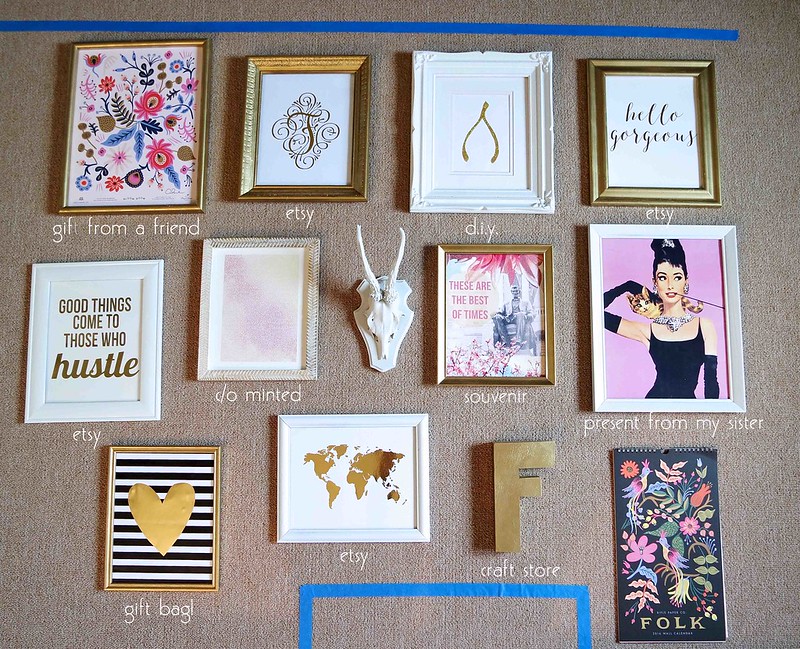
One of my most favorite things in our house is the gallery wall above my desk. While decorating the rest of the house, I tried really hard to not make it a very girly space (although CR will tell you that my white furniture and gold accents don't really agree with that statement). The one space I knew I was going to have be a bit more girly was my desk area, and that the gallery wall was going to take center stage. My gallery walls have gone through a few versions over the years and I think this is my favorite yet. Here's a step by step guide on how I built my gallery wall without spending a ton of money!

step one: pick your colors


I started my gallery wall years ago - I knew when I moved for school two years ago that it was really going to be the first time that I've had my own room to do whatever I want with, so I wanted it to be cute and girly without being over the top. I love how gold and white look together, so that's how I chose my eventual frame color. For my current gallery wall, I wanted a bit more color, so a pretty pink became my accent color. And, of course, black goes with everything.

I find it helps having a general color palette to stick to because not only does it look cohesive, but it also helps to narrow down what goes in your frames.

step two: find your frames

Frames can be the most expensive part of this whole project...but they don't have to be. Every Goodwill I've ever been in has a huge frames section, and I've never seen a normal sized frame cost more than $2. In just a few visits, you can source all the frames you need. I loved doing this because not only did it make the project super cheap, but you can get some really unique looking frames. I always bought real wood frames that for the most part had glass in it (but that wasn't really a requirement for me).

Once you have all of your frames, it's time to clean and spray paint them. I (okay, CR) painted them all again when we moved so that my newer frames matched my older ones that I painted three years ago. I let them set for at least 24 hours before adding the art.

step three: find the art
  • Search Etsy: Etsy has literally thousands of shops with prints! I wanted gold foiled ones, so that's what I searched for. On my gallery wall I have a map print, hustle print, and hello gorgeous print that I bought from this shop (use code FRAN30 to save 30% on an order if you find anything you love!). My F print is from this shop. 
  • Get crafty: This is a great way to get the look for less - if you have a water color print you love, why not try to make a version yourself? My wishbone was made by my mom with a piece of white cardboard and glitter glue - super inexpensive, but adorable. The wood 'F' is something I found at Joanns fabric store for like $3, and spray painted when I painted the frames.
  • Make it personal: My favorite part! This sometimes takes some time, but it's the part that'll mean the most. The antlers are from a deer my grandpa shot in 1979 - when he died, all the girls in my family got one set of his antlers, and we all have since spray painted them and have them in our homes. The Audrey poster was a Christmas present from my sister that I've had for years now - it's one of my favorites. The Abe poster is from a paper goods store in Madison and depicts one of my favorite places on the planet (plus they really were the best of times!). The Rifle Paper Company print was a present from my friend Ben, who actually met Anna at a pop-up even (it's signed in the corner!). 
  • Think outside of the box: Not every item in your gallery wall has to be a print or a piece of art. See that framed heart in the bottom left? That's actually a gift bag from Target - it cost $2!  
  • Add a calendar: If your gallery wall is going in an office or a kitchen, this is a great way to add variation to your wall. It changes every month, and I think adds that little something extra. Mine is from Rifle Paper Company and I'm obsessed with it. 
  • Get it pre-framed: Minted reached out to me a few weeks ago and asked if I wanted to add one of their limited printed pieces of art to my collection, which was such perfect timing since I was in the process of re-doing my gallery wall! Using Minted was a wonderful way to add a unique piece of art to my wall, and the process was so easy. Since I knew I wanted a pink colored piece, I was able to narrow down their vast collection down to a smaller selection. Once you choose your art, you can also choose what frame (or no frame!) you want. I went with this pretty staccato sunset print (sunsets are my favorite) and the herringbone frame to add some dimension to the wall. I also elected to have the artist add their signature at the bottom, which I think is a great touch that makes it even more personal.
where to buy gallery wall art

step four: put it all together
  • Lay them out: Measure your intended area for the gallery wall, and then tape out this area on the floor. This is especially important if you are working with a larger gallery wall. I also added the outline of my computer on the bottom, as I wanted the gallery to go around it. Lay out all of your frames in your area, and play around with it. Move items around, have others look at it, and then step away for a little bit - a fresh eye an hour later will prevent any regrets once it is on the wall! I generally like the frames to be a bit staggered, especially since there were so many pieces to work with (an exception to this is the gallery wall above our bed - the frames just worked out perfectly into a rectangle!)
  • Make a paper-gallery: This part is kind of annoying, but vital (and really only takes about ten minutes). Cut out the shape of each frame (I used cheap white construction paper from Michael's), flip each frame upside down, and place the paper over it. Then punch a hole into the paper where the nail will go. 
  • Hang up the paper-gallery: Since you have the ground layout, measure where you laid your frames on the floor, and then measure that point on the actual wall - and just hang up your paper-gallery with painters tape. The great thing about this is that you can see how everything actually looks on the wall. When I got my paper-gallery on the wall, I realized everything was just a little too high up on the wall, so I simply just moved the papers down. It saved me 12 extra holes in the wall.
  • Nail the nails and hang up your frames: The best part! Since each paper has a hole where the nail goes, all you have to do is put the actual nail in the hole and hammer! Then hang up your frames...
how to hang up a gallery wall

step 5: admire your work!


gallery wall on a budget
p.s.
the flowers are fake because i'm lazy and my cat likes to eat flowers 
the monogrammed pencil holder is from design darling
my computer background was created using photoshop (+ this monogram tool)
the heart post-its are from amazon
my lamp is from target & is no longer available (although this one is, and is even cooler)


Wednesday, November 4, 2015

taking my own advice

DSC00142

A couple of weeks ago I said I was going to try wearing more outfits I liked just because I liked them, and not not wear them just because they may look better on someone else. I figured it was time to actually do that! This outfit was inspired by Kimberly - I tried wearing a button-up under this fluffy (so comfy!) turtleneck, but since the sweater is already very thick, it didn't look good. So this is my own version. There are of course things I would change (hello, drop shoulder sweaters. who thought you were a good idea? probably not someone with broad shoulders!) but I also just loved being comfy and cozy and not necessarily worrying about how it could look better.

Baby steps!
DSC00130
DSC00131
DSC00122
Sweater: BB Dakota c/o Shopbop [exact]
Vest: J.Crew Factory [very similar]
Jeans: Uniqlo [exact]
Shoes: Sperry [exact on sale!]
Watch: c/o Daniel Wellington [exact]
DSC00115


Tuesday, November 3, 2015

beauty tuesday: paula's choice skin perfecting' 2% BHA liquid

SAM_0771

Since using and falling in love with Paula's Choice Acne kit (full review here) last spring, my skin has been better than it has been in years. Once I ran out of most of the products in the acne kit this summer, and since my skin was no longer experiencing the acne I was before, I felt it was time to try something new. I did want something to keep my skin looking as clear as it was, and then some. Several of you guys have raved about Paula's Choice perfecting exfoliant, so I was eager to try it out. I'm a huge Paula's Choice fan because not only do their products actually work, but they have the scientific research that stands behind it. They also have a whole site dedicated to comparing beauty products, not just their own. Overall, they are a wonderful skin resource, and I'm always eager to try more of their products.

What it promises:
This gentle, leave-on exfoliant rapidly unclogs pores, diminishes wrinkles and improves skin tone for unbelievably smooth, radiant skin.
  • Anti-Aging, Blackheads, Enlarged Pores, Redness, Wrinkles
  • For All Skin Types
  • 2% BHA unclogs & diminishes enlarged pores & builds collagen
  • Green tea extract reduces redness & irritation
  • Dramatically improves skin’s texture for radiant, even-toned skin
  • Clinically proven to hydrate, brighten & reduce fine lines

How to use it:
I use it in the morning, as I use a retinoin cream in the evening. After washing and drying my face, I apply the product to my face with a cotton round. I wait about thirty seconds, and then apply my moisturizer. 

What it does for me:
I think this is a perfect product for those of us past the real acne-filled stage of skin, and now are more worried about anti-aging products. I have found that my skin is a lot softer and more even-toned. My skin overall looks smoother, which means I wear less make up.  The hyper-pigmentation from acne is fading, and I haven't had a real break-out, no matter the time of the month. I have fairly sensitive skin, and haven't had any irritation or redness from using it. Even CR has commented on how nice my skin has looked lately. 

What I don't like:
I have larger pores on my nose, and although it promises a reduction in their appearance, I haven't found that to be true (my dermatologist says that there isn't really anything you can do about that, which is unfortunate). It also irritates my eyes if I get anywhere too close to them (which is my own fault, as the directions very clearly say to stay away from the eye area). 

Would I buy this again?
Absolutely. This is a holy-grail item for me. Prior to this, I used most of my "treatment" products at night. This is an easy way to treat my skin in the morning, and it ensures I always start with a clean fresh face. Since I only use 3-5 drops a day, this one bottle should last a very very long time. The price is $28 for a 4 ounce bottle. 

I included a side by side of my progression through the Paula's Choice product line. As I disclaimer, I recently started using a tretinoin cream a few weeks ago, but found that I achieved these results before I started using it. I'm also currently a little tanner than I was in June :)
Paula's Choice Skin Perfecting 2% BHA Liquid

For you Paula's Choice fans - is there any must-have product you can't live without? I'm currently looking for a mask/weekly treatment, as well as an eye cream, if anyone as any suggestions!